Paper chains were one of the first Christmas crafts most of us ever made, and in my years running activities I’ve never known them to fail. Turn the plain loops into a jolly Santa, a frosty Snowman and a cheeky Elf and you have a Christmas paper chains activity that gets the whole table talking, laughing and remembering the decorations they made as children.
It suits every ability. Some residents will happily cut and glue every loop themselves, while others simply choose the pieces and press them into place. Everyone ends up with a cheerful character to hang on the tree or by their door. To save you hours of drawing, I’ve made a free printable of the Santa, Elf and Snowman paper chain templates; you’ll find it in the download section below.

Free Santa, Elf and Snowman Paper Chain Templates
The download has three landscape pages and prints on either A4 or US letter (8.5 x 11 in) paper. Choose Actual size / 100% in your printer settings so the pieces fit the loops.
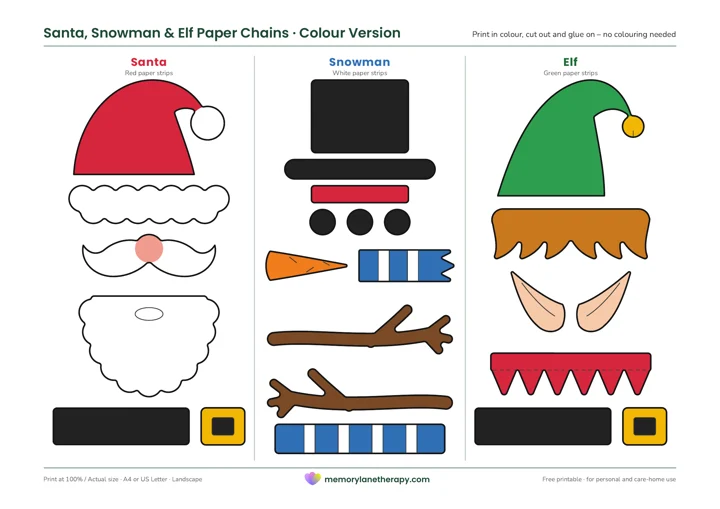
- Page 1, the outline templates: large, easy-to-cut pieces in bold black outlines for residents to colour in. Santa has a hat, hat trim, moustache, beard, belt and buckle. The Snowman has a top hat, brim, hat band, carrot nose, buttons, two stick arms and a scarf. The Elf has a pointed hat, hair, two ears, a collar, belt and buckle.
- Page 2, the colour version: the same pieces already coloured in, for days when you want to skip straight to cutting and gluing.
- Page 3, instructions and an actual-size strip guide: step-by-step instructions, a picture of the finished characters, and a 5 x 21 cm (2 x 8¼ in) strip you can trace onto coloured paper.
Scroll down to the download section below to get your free copy of the templates.
Materials Needed for Christmas Paper Chains
- Coloured paper or thin card: red for Santa, white for the Snowman and green for the Elf, plus a skin-tone or white sheet for the faces.
- The free paper chain templates: printed on plain paper (to colour in) or in colour.
- Scissors: include a pair of easy-grip or spring-loaded scissors for anyone with arthritis.
- Glue sticks: easy to hold and far less messy than liquid glue.
- Black marker and coloured pencils or crayons: for colouring the pieces and drawing on eyes and smiles.
- Optional: cotton balls to make Santa’s beard fluffy, and a paper clip for each loop while the glue sets.

How to Make Santa, Snowman and Elf Paper Chains
Step 1: Prepare the Strips and Pieces
Cut the coloured paper into strips 5 cm (2 in) wide, cutting across the short side of an A4 or US letter sheet. That gives strips about 21 cm (8¼ in) long, and you’ll get five or six from each sheet. Cut out the template pieces too, or let residents cut them if they enjoy it. I put each character’s pieces in its own small bowl so people can see exactly what goes with what.

Step 2: Make the Face Loop
Start with the face. Curl a skin-tone strip (white for the Snowman) into a loop, overlap the ends by about 1.5 cm (½ in) and glue them together. Hold it for a slow count of ten, or clip it with a paper clip while the glue grabs.
Step 3: Build the Body
Thread the next strip through the face loop and glue it closed. Use red for Santa, white for the Snowman and green for the Elf. Keep adding loops until the character is as tall as you like. Three or four body loops look lovely on a tree, and longer chains look wonderful hanging in a doorway.

Step 4: Bring the Characters to Life
Santa: Glue the hat to the top of the face loop with the fluffy hat trim across its base. Add the beard to the lower half of the face, then the moustache and nose over the top of it. Draw two eyes and add rosy cheeks.
Snowman: Glue the hat band across the top hat, then glue the brim along the bottom of the hat and stick it to the top of the face loop. Add the carrot nose, draw coal eyes and a dotted smile, and wrap the scarf around the bottom of the face with the scarf end hanging down. Glue the stick arms to the sides of the first body loop and the three buttons down its front.
Elf: Tuck the ears behind each side of the face loop, then glue on the hair and the pointed hat. Add the collar just below the face and draw a happy smile.
Santa and the Elf: Glue the belt around one of the body loops with the gold buckle in the middle.

Step 5: Display Your Christmas Characters
When the glue is dry, hang your festive friends on the Christmas tree, from doorways and windows, or along a wall in the lounge. They look best as a little family of three, and residents love pointing out the one they made to visitors.

Making It Work for Every Ability
- Limited hand strength or arthritis: Pre-cut the strips and pieces and pre-glue the loops. Residents can then choose a character and press the pieces into place.
- Living with dementia: Offer one character at a time and hand over one piece at a time. Showing a finished example works far better than a long explanation.
- Low vision: Print the template on brightly coloured card so the black outlines stand out, and work in good light.
- Keen crafters: Ask them to colour, cut and assemble the whole chain, or to make a long chain for the dining room.
- One-to-one visits: A carer or caregiver can make a single character with a resident in about 20 minutes. It’s a lovely gentle activity for bedside visits.
Questions to Spark Christmas Memories
Paper chains bring memories flooding back, so keep the conversation going while you work:
- Did you make paper chains at school or at home when you were young?
- Who decorated the tree in your house, and when did it go up?
- Did you ever leave out a treat for Santa on Christmas Eve?
- Have you ever built a snowman, or seen a white Christmas?
- Which decoration from your childhood do you remember most?
For plenty more conversation starters, see our Christmas reminiscing questions.
Watch How the Paper Chain Characters Come Together
This short video shows the characters being put together, and it’s handy to play for the group before you start.
More Christmas Crafts for Seniors
- Sock Snowman Craft: a soft, tactile snowman made from a white sock and rice.
- Santa Popsicle Stick Craft: mini Santa ornaments made from painted craft sticks.
- Easy Christmas Decorations: simple handmade decorations to brighten the lounge.
- Easy DIY Pop-Up Christmas Card: a pop-up card residents can send to family.
Your free Santa, Elf and Snowman paper chain templates are in the download section below. Merry Christmas from all of us at Memory Lane Therapy!
Download your printable PDF copy of Santa, Snowman & Elf Christmas Paper Chains for Seniors (Free Template)